
Optical Character Recognition with ML.NET and F#

In this article, I’m going to build an app that recognizes handwritten digits from the famous MNIST machine learning dataset:

The MNIST challenge requires machine learning models to read images of handwritten digits and correctly predict which digit is visible in each image. It's a common benchmark for computer vision systems designed for optical character recognition.
The MNIST challenge may seem quite easy, but look at this:
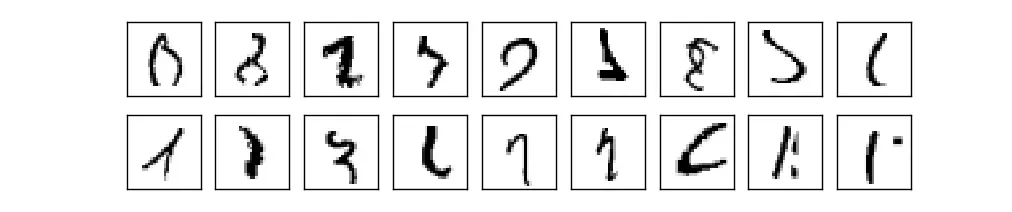
These are actual digits from the dataset. Are you able to identify each one? It probably won’t surprise you to hear that the human error rate on this exercise is about 2.5%.
There are 70,000 images of 28x28 pixels in the dataset. I’m going to use a truncated set of 5,000 images to speed up the training.
And I’ll build my app in F# with ML.NET and NET Core.
ML.NET is Microsoft’s new machine learning library. It can run linear regression, logistic classification, clustering, deep learning, and many other machine learning algorithms.
And F# is a perfect language for machine learning. It’s a 100% pure functional programming language based on OCaml and inspired by Python, Haskell, Scala, and Erlang. It has a powerful syntax and lots of built-in classes and functions for processing data.
The first thing I‘ll need for my app is a data file with images of handwritten digits. I will not use the original MNIST data because it’s stored in a nonstandard binary format.
Instead, I’ll use these excellent CSV files prepared by Daniel Dato on Kaggle.
There are 60,000 images in the training file and 10,000 in the test file. Each image is monochrome and resized to 28x28 pixels.
The training file looks like this:
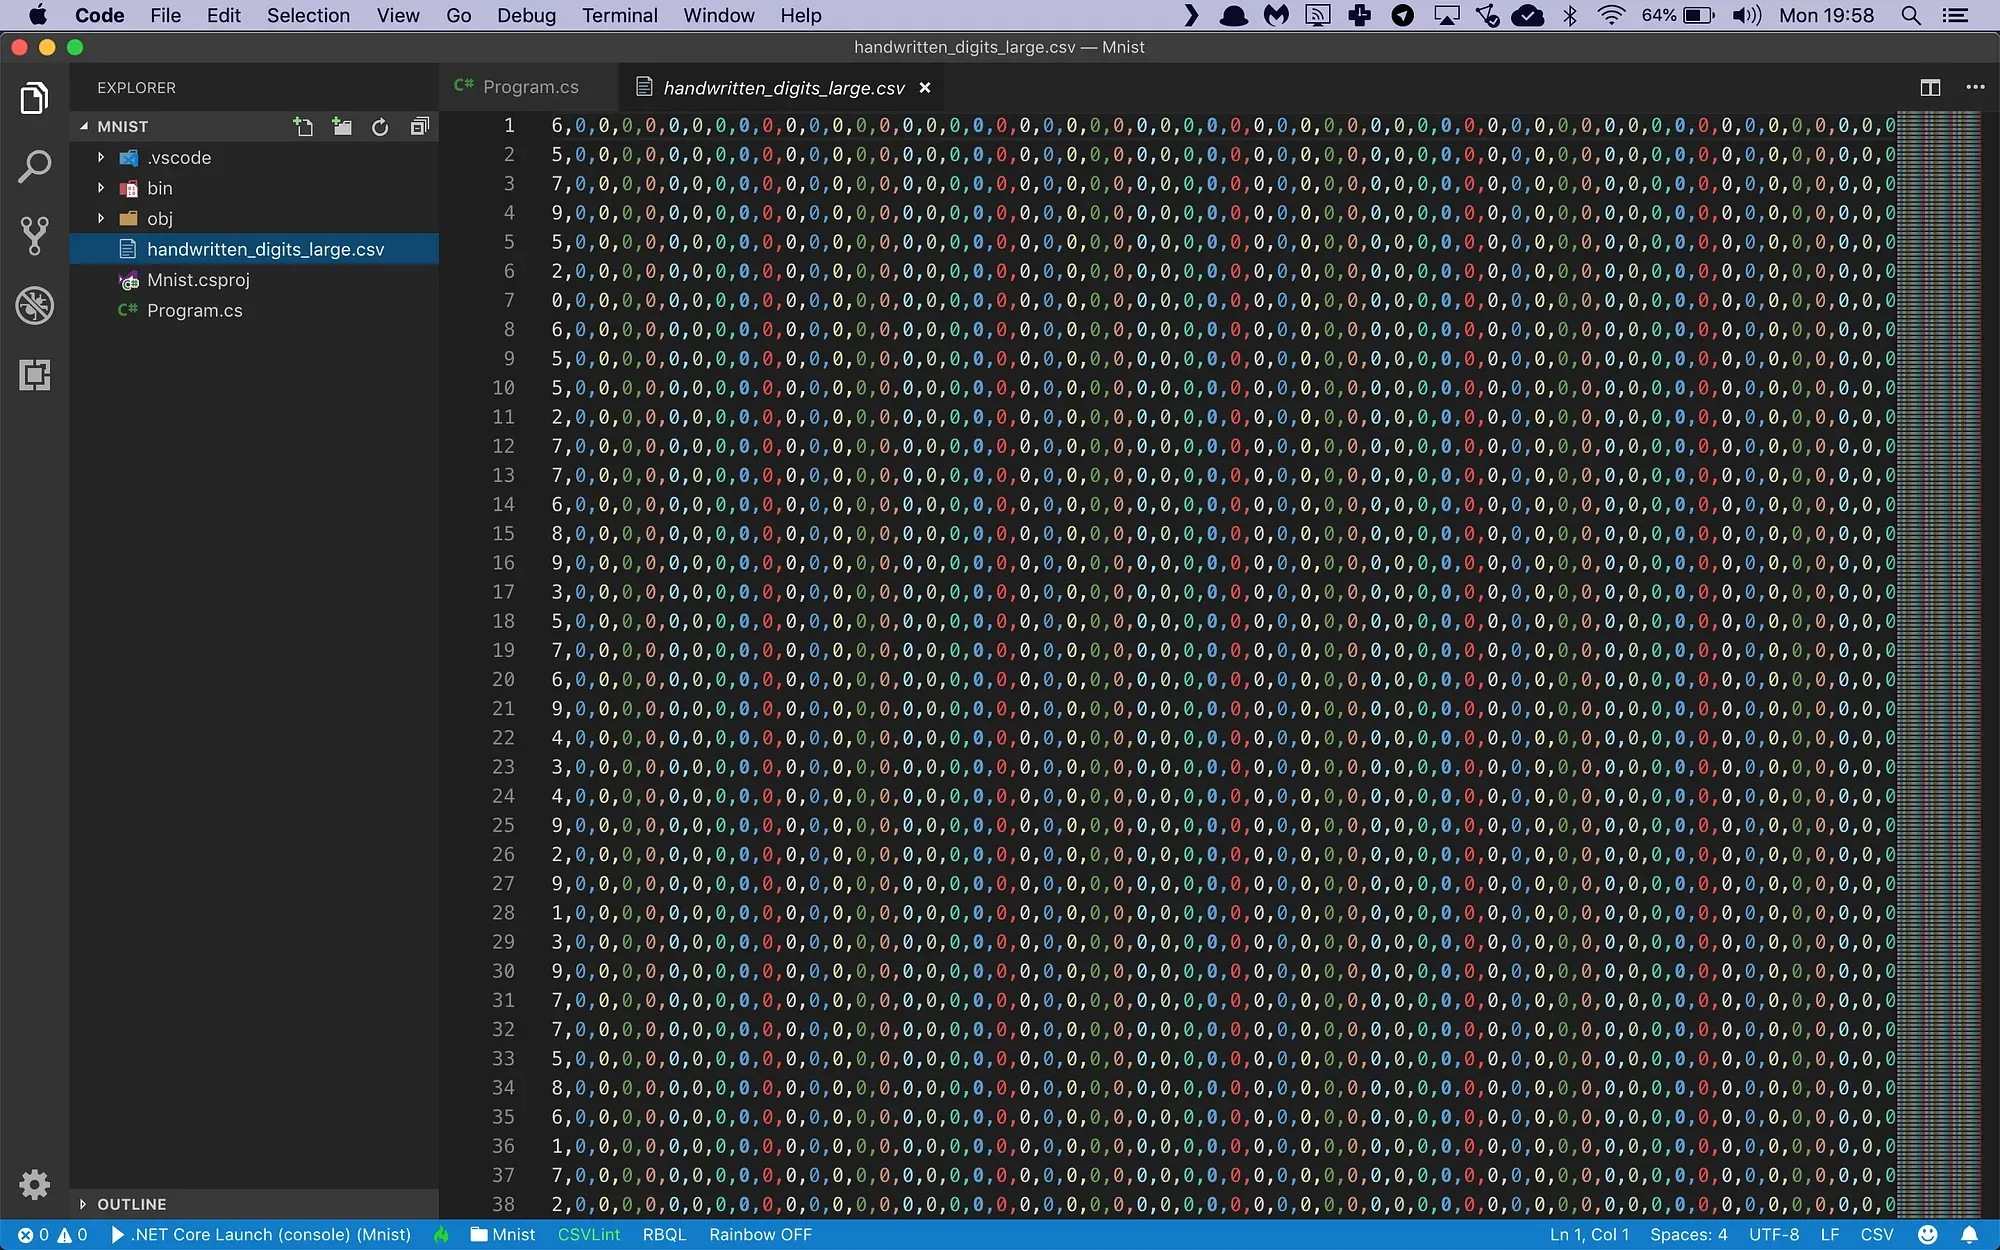
It’s a CSV file with 785 columns:
- The first column contains the label. It tells us which one of the 10 possible digits is visible in the image.
- The next 784 columns are the pixel intensity values (0..255) for each pixel in the image, counting from left to right and top to bottom.
I am going to build a multiclass classification machine learning model that reads in all 785 columns, and then makes a prediction for each digit in the dataset.
Let’s get started. I’m going to create a new F# console project:
$ dotnet new console --language F# --output mnist
$ cd mnist
And now I’ll install the ML.NET package:
$ dotnet add package Microsoft.MLNow I’m ready to start coding. I am going to replace the contents of the Program.fs file with this:
open System
open System.IO
open Microsoft.ML
open Microsoft.ML.Data
open Microsoft.ML.Transforms

/// The Digit class represents one mnist digit.
[<CLIMutable>]
type Digit = {
    [<LoadColumn(0)>] Number : float32
    [<LoadColumn(1, 784)>] [<VectorType(784)>] PixelValues : float32[]
}

/// The DigitPrediction class represents one digit prediction.
[<CLIMutable>]
type DigitPrediction = {
    Score : float32[]
}
The Digit type holds one single MNIST digit image. Note how the PixelValues field is tagged with a VectorType attribute. This tells ML.NET to combine the 784 individual pixel columns into a single vector value.
Also note how each field is tagged with a LoadColumn attribute that tells the CSV data loading code which column to import data from.
There’s also a DigitPrediction type which will hold a single prediction. And notice how the prediction score is actually an array? The model will generate 10 scores, one for every possible digit value.
Also note the CLIMutable attribute that tells F# that we want a ‘C#-style’ class implementation with a default constructor and setter functions for every property. Without this attribute the compiler would generate an F#-style immutable class with read-only properties and no default constructor. The ML.NET library cannot handle immutable classes.
Next I’m going to load the data in memory:
/// file paths to train and test data files (assumes os = windows!)
let trainDataPath = sprintf "%s\\mnist_train.csv" Environment.CurrentDirectory
let testDataPath = sprintf "%s\\mnist_test.csv" Environment.CurrentDirectory

[<EntryPoint>]
let main argv =

    // create a machine learning context
    let context = new MLContext()

    // load the datafiles
    let trainData = context.Data.LoadFromTextFile<Digit>(trainDataPath, hasHeader = true, separatorChar = ',')
    let testData = context.Data.LoadFromTextFile<Digit>(testDataPath, hasHeader = true, separatorChar = ',')

    // the rest of the code goes here....

    0 // return value
This code uses the LoadFromTextFile function to load the CSV data directly into memory. I call this function twice to load the training and testing datasets separately.
Now let’s build the machine learning pipeline:
// build a training pipeline
let pipeline =
    EstimatorChain()

        // step 1: map the number column to a key value and store in the label column
        .Append(context.Transforms.Conversion.MapValueToKey("Label", "Number", keyOrdinality = ValueToKeyMappingEstimator.KeyOrdinality.ByValue))

        // step 2: concatenate all feature columns
        .Append(context.Transforms.Concatenate("Features", "PixelValues"))

        // step 3: cache data to speed up training
        .AppendCacheCheckpoint(context)

        // step 4: train the model with SDCA
        .Append(context.MulticlassClassification.Trainers.SdcaMaximumEntropy())

        // step 5: map the label key value back to a number
        .Append(context.Transforms.Conversion.MapKeyToValue("Number", "Label"))

// train the model
let model = trainData |> pipeline.Fit

// the rest of the code goes here....
Machine learning models in ML.NET are built with pipelines, which are sequences of data-loading, transformation, and learning components.
This pipeline has the following components:
- MapValueToKey which reads the Number column and builds a dictionary of unique values. It then produces an output column called Label which contains the dictionary key for each number value. We need this step because we can only train a multiclass classifier on keys.
- Concatenate which converts the PixelValue vector into a single column called Features. This is a required step because ML.NET can only train on a single input column.
- AppendCacheCheckpoint which caches all training data at this point. This is an optimization step that speeds up the learning algorithm which comes next.
- A SdcaMaximumEntropy classification learner which will train the model to make accurate predictions.
- A final MapKeyToValue step which converts the keys in the Label column back to the original number values. We need this step to show the numbers when making predictions.
With the pipeline fully assembled, I train the model by piping the training data into the Fit function.
So now I have a fully- trained model. It’s time to take the test set, predict the number for each digit image, and calculate the accuracy metrics of the model:
// get predictions and compare them to the ground truth
let metrics = testData |> model.Transform |> context.MulticlassClassification.Evaluate

// show evaluation metrics
printfn "Evaluation metrics"
printfn "  MicroAccuracy:    %f" metrics.MicroAccuracy
printfn "  MacroAccuracy:    %f" metrics.MacroAccuracy
printfn "  LogLoss:          %f" metrics.LogLoss
printfn "  LogLossReduction: %f" metrics.LogLossReduction

// the rest of the code goes here....
This code pipes the test data into the Transform function to set up predictions for every single image in the test set. Then it pipes these predictions into the Evaluate function to compare these predictions to the actual labels and automatically calculate four metrics:
- MicroAccuracy: this is the average accuracy (=the number of correct predictions divided by the total number of predictions) for every digit in the dataset.
- MacroAccuracy: this is calculated by first calculating the average accuracy for each unique prediction value, and then taking the averages of those averages.
- LogLoss: this is a metric that expresses the size of the error in the predictions the model is making. A logloss of zero means every prediction is correct, and the loss value rises as the model makes more and more mistakes.
- LogLossReduction: this metric is also called the Reduction in Information Gain (RIG). It expresses the probability that the model’s predictions are better than random chance.
We can compare the micro- and macro accuracy to discover if the dataset is biased. In an unbiased set each unique label value will appear roughly the same number of times, and the micro- and macro accuracy values will be close together.
If the values are far apart, this suggests that there is some kind of bias in the data that we need to deal with.
To wrap up, let’s use the model to make a prediction.
I’m going to pick five arbitrary digits from the test set, run them through the model, and make a prediction for each one.
Here’s how to do it:
// grab five digits from the test data
let digits = context.Data.CreateEnumerable(testData, reuseRowObject = false) |> Array.ofSeq
let testDigits = [ digits.[5]; digits.[16]; digits.[28]; digits.[63]; digits.[129] ]

// create a prediction engine
let engine = context.Model.CreatePredictionEngine model

// show predictions
printfn "Model predictions:"
printf "  #\t\t"; [0..9] |> Seq.iter(fun i -> printf "%i\t\t" i); printfn ""
testDigits |> Seq.iter(
    fun digit ->
        printf "  %i\t" (int digit.Number)
        let p = engine.Predict digit
        p.Score |> Seq.iter (fun s -> printf "%f\t" s)
        printfn "")
This code calls the CreateEnumerable function to convert the test dataview to an array of Digit instances. Then it picks five random digits for testing.
I then call the CreatePredictionEngine function to set up a prediction engine.
The code then calls Seq.iter to print column headings for each of the 10 possible digit values. I pipe the 5 test digits into another Seq.iter, make a prediction for each test digit, and then use a third Seq.iter to display the 10 prediction scores.
This will produce a table with 5 rows of test digits, and 10 columns of prediction scores. The column with the highest score represents the ‘winning’ prediction for that particular test digit.
That’s all there is to it!
I can run my code like this:
$ dotnet runAnd here’s what that looks like in Windows Terminal:
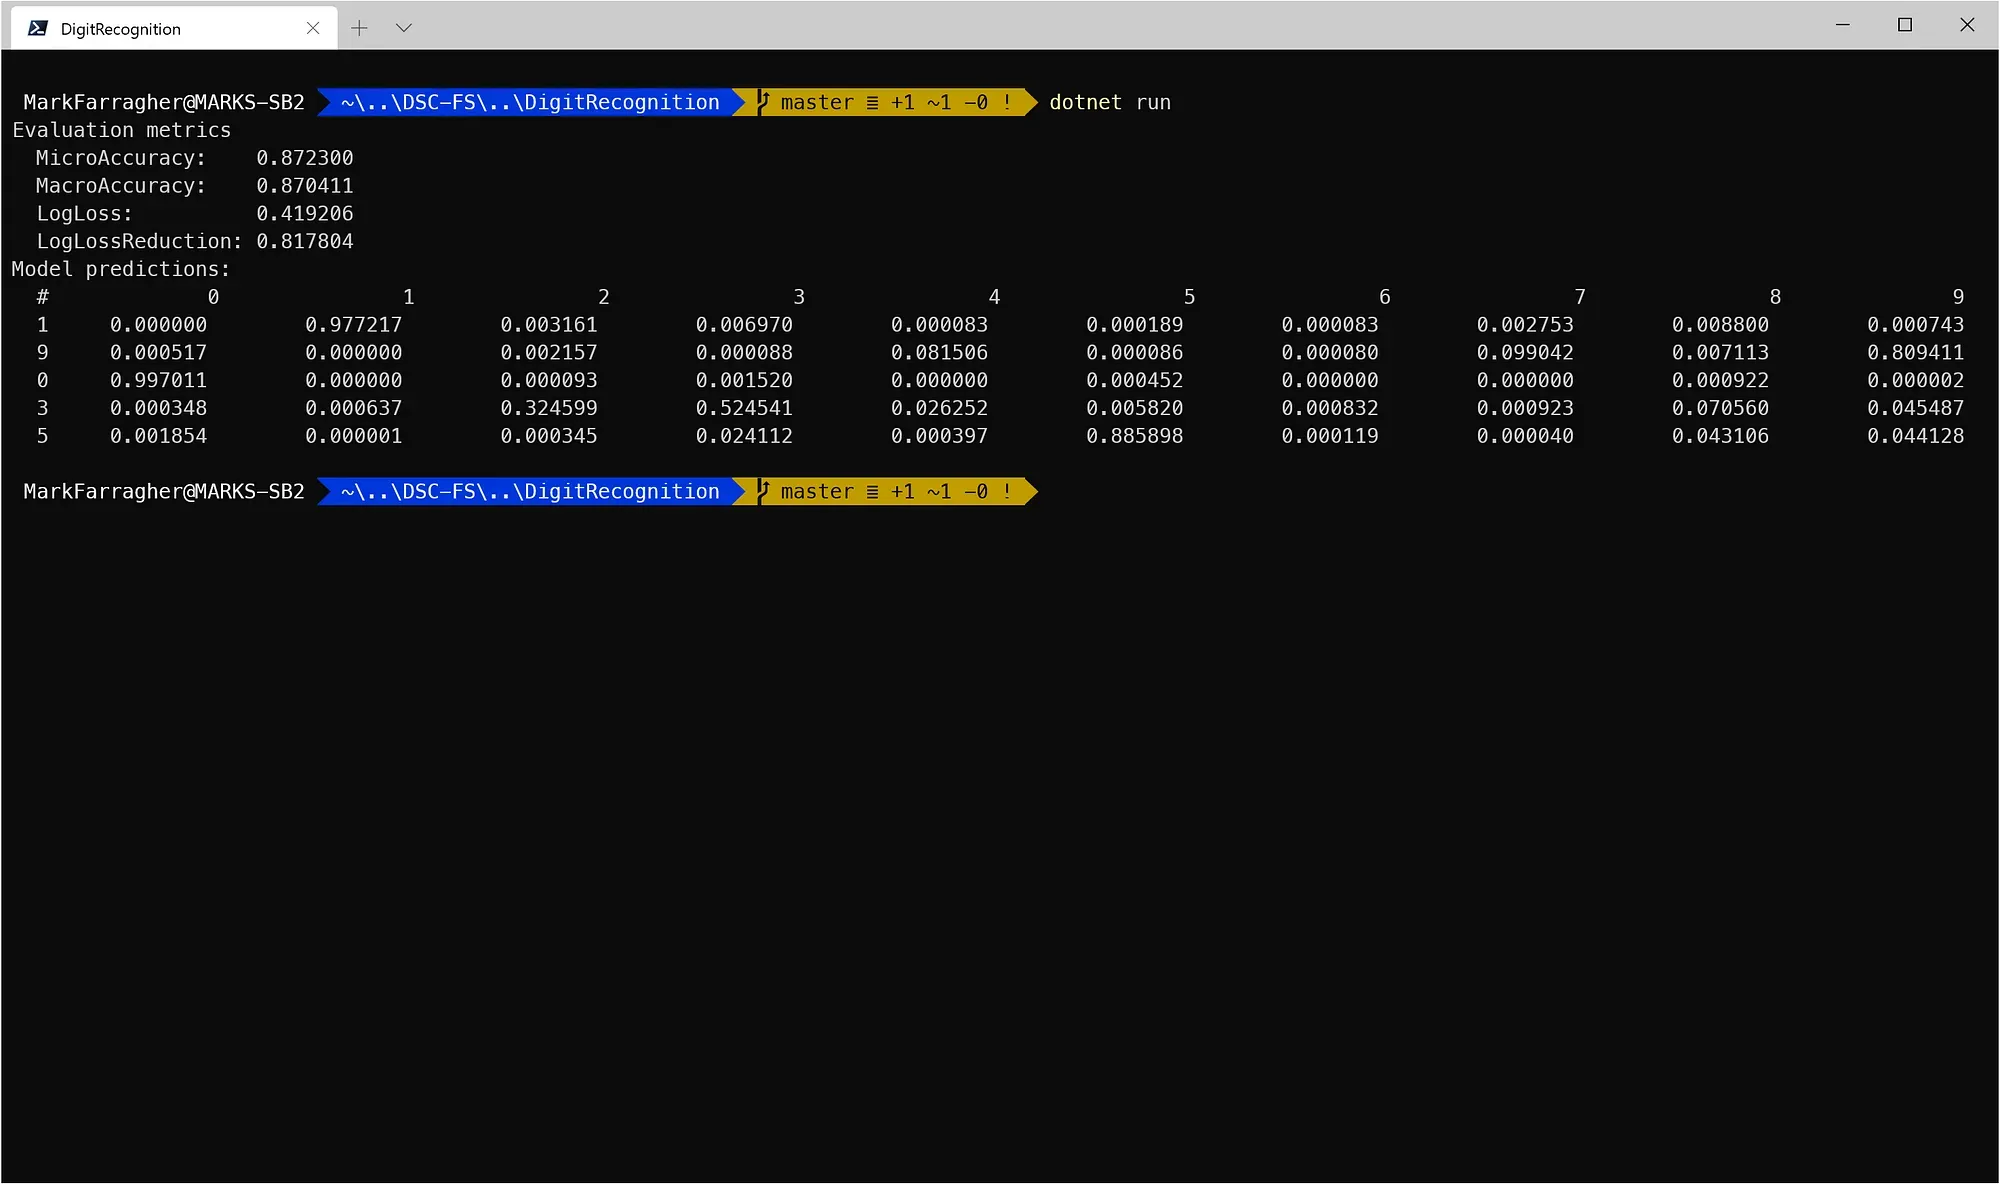
I get a MicroAccuracy value of 0.872 and a MacroAccuracy value of 0.870. These two values are close together, which means that the dataset is not biased. Each digit occurs roughly the same number of times in the file.
A micro-accuracy of 87% is not bad at all. It means that out of 100 digits, my model only makes 13 mistakes. But keep in mind that a human would only make 2.5 mistakes on the same task! This model is nowhere near human performance.
And here are the results for the five test digits:
- The first prediction scores 97.72% on ‘1’ which is correct.
- The second prediction scores 80.94% on ‘9’ (correct) and 8.15% on ‘4’. And this make sense if you think about it — a 4 and a 9 do look very similar. But the model correctly picks ‘9’ as the most likely solution.
- The third prediction scores 99.70% on ‘0’ which is correct.
- The fourth prediction scores only 52.45% on ‘3’. The model thinks the number could also be a ‘2’, a ‘9’, an ‘8’, or a ‘4’. This also makes sense — a very sloppily drawn 3 could indeed look like a 2, a 9, or an 8.
- And the fifth prediction scores 88.59% on ‘5’ which is correct.
All five test predictions are correct.
F# ML.NET Machine Learning Training
This benchmark is part of my online training course Machine Learning with F# and ML.NET that teaches developers how to build machine learning applications in F# with Microsoft's ML.NET library.

Machine Learning With F# and ML.NET
This course will teach you how to build Machine Learning apps in F# with Microsoft's ML.NET library.
I made this training course after I had already completed a similar machine learning course on C# with ML.NET, and I was looking for an excuse to start learning the F# language.
After I started porting over my C# code examples to F#, I noticed that the new F# code was often a lot shorter and easier to read than the corresponding C# code. In my opinion, that makes F# the ideal language for building machine learning apps.
Anyway, check out the training if you like. It will get you up to speed on the ML.NET library and you'll learn the basics of regression, classification, clustering, gradient descent, logistic regression, decision trees, and much more.